DISCLAIMER: This blogpost is composed by PlayaWeatherman.So, you’ve gone through all the trouble to obtain your RFC and now when you go somewhere and plan to use your RFC, guess what, they want one that is dated from within the last 30 days. You can go down the nearest SAT office and wait in line to have them print it out. Or you can go online and print it off yourself. And it is actually pretty fast and easy.
Before you start make sure you have the paperwork from when you received your initial RFC from the SAT office. And you need the USB drive that contains your electronic signature (e.firma). If you have that, you are good to go.
Here are the steps with screenshots to follow to print your RFC from the SAT website. Please note that where you see black boxes, I have blocked out where there is personal information. Your information will show up in these locations.
NOTE: This process worked as of the date of this blogpost. As with most technology, the process may change and websites may change or be down.
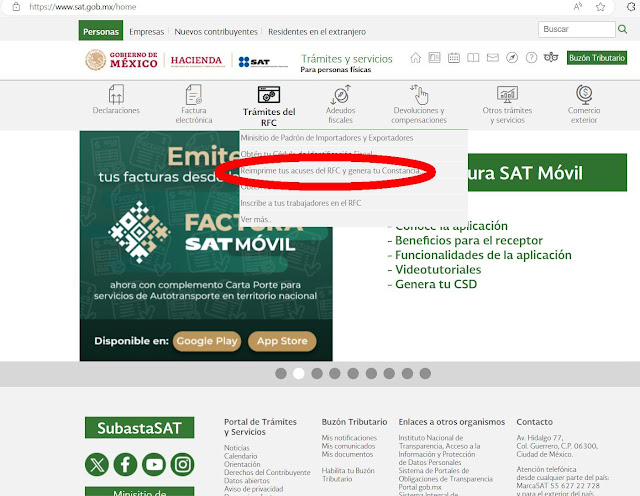
1 – Go to the SAT website (www.sat.gob.mx) and click on the Tramites del RFC icon (in red circle below). NOTE: Make sure you DO NOT have automatic translation turned on in your browser or the items you need to click on will not be the words used in these instructions.
2 – Then in
the dropdown box click on “Reimprime tus acuses del RFC y genera tu Constancia”
3 – On page that displays, enter your RFC, password (that you chose when you obtained your RFC), the Captcha code and then click the “e.firm” button.
4 – On the next screen click on “Buscar” next to the Certificado (.cer) line. This will bring up next dialogue box.
5 – Then you have to navigate to the USB drive and find the “.cer” security certificate file. Once you find it, select it and click “Open”
6 – You will then be sent back to the “Acceso con e.firma” page. Click on “Buscar” next to the Clave privada (.key) line. This will bring up next dialogue box.
7 – Then you have to navigate to the USB drive and find the “.key” KEY file. Once you find it, select it and click “Open”
8 – You will then be sent back to the “Acceso con e.firma” page. Now enter your password and click “Enviar”.
9 – Finally enter your RFC number and click “Enviar”
10 – On the Reimpresion de Acuses page, just click on “Generar Constancia”. Do not fill in any information on this page or choose any pull-downs.
11 – And like magic, your RFC pops up. You can choose to print directly from here or save the pdf file to your computer.
Now wasn’t that easy!


No comments:
Post a Comment